

Planning a Carcass Ultrasound Session
By by Dr. Carl Dahlen, University of Minnesota Beef TeamIn recent years, beef breed associations have seen a dramatic increase in the use of ultrasound to evaluate carcass characteristics. With ultrasound technology, we are able to collect carcass data from animals without harvesting them. Thus, data are available from a much larger population of animals than traditional harvest carcass data. Breeding bulls and replacement heifers, which make up a very large portion of seedstock calf crops, can all have data collected and sent to breed associations for use in EPD calculations.
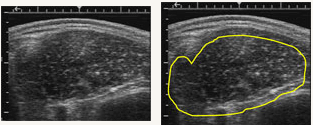
Ultrasound technology uses high frequency sound waves directed straight down from a probe to penetrate through tissues in the body. The grayscale image viewed on an ultrasound monitor is actually the sound waves that are returning to the probe. Because muscle tissue, fat, and bone have different densities, the ultrasound waves pass through the respective tissue at different speeds, and are completely blocked by some high density tissue (ie.. bone). Tissue of high density comes back as a bright white image (bone), and low density fluids (urine, etc) come back as a black image. The pictures below are examples of ribeye scans. Notice the variation in color of the different tissues, and the outlined are of the ribeye area on the right image

A typical scan session involves the collection of 3 types of images: 1) Rump fat; 2) Ribeye area (REA) and backfat (BF); and 3) Percent Intramuscular Fat (%IMF, which is used to predict marbling). The %IMF reported is an average of values obtained from 4 separate images.
In the case of seedstock producers planning to send images to their respective breed associations for calculation of EPDs, note that the technician collecting the ultrasound images is typically not the technician who will be interpreting the images. The Ultrasound Guidelines Council (UGC) is the body adopted by the U.S. Beef Breeds Council to govern the area of ultrasound image collection and interpretation and to certify both image collection and image interpretation technicians. The UGC requires images to be interpreted by a third party (a Centralized Ultrasound Processing lab; CUP lab). Having data interpreted by a CUP lab ensures that images will be handled in a manner that has rigid quality control standards and accurate interpretation of images. If images do not meet the UGC standards, they will not be interpreted and data will be missing for that particular animal. In some instances it is not possible to obtain quality images from certain animals, but technicians strive to minimize this occurrence.
Don’t be surprised if an ultrasound technician is hesitant to reply to questions concerning the size of a ribeye or %IMF from a favorite calf. If a technician were to venture an educated guess that didn’t exactly match up with the CUP lab interpretation, the producer may have issues with the technician. It is in everyone’s best interest to have questions answered by the data returned from the breed associations.
The debate over clipping prior to scanning is quickly ended when both breed associations and CUP labs required hair to be clipped to less than ½ inch. Clipping allows technicians to collect high quality images, and UGC guidelines allow for cattle to be scanned on either side of the body, so a non-clipped “show-side” is still possible (although most technicians scan on the right side of animals).
If you’re getting ready to have your cattle scanned, several things should be kept in mind in order to get the most out of your data, and to have the scanning session go smoothly.
- Contemporary groups should be properly identified. In a herd where all calves were treated the same, there would be 2 or 3 contemporary groups; bulls, heifers, and possibly steers are all separate groups. In herds where several groups of cattle were maintained, such as cattle in a show string that were fed a different ration, or where only a portion of the herd was weaned early for whatever reason, it is very important to place these cattle in separate contemporary groups
- A weight within 7 days of the scan session is required. Breed associations use this weight, and age of the animal as adjustment factors for their EPD calculations and will not use data not accompanied by a weight.
- Make sure the animals fall within the breed-specific age range for scanning. Typically the age targeted is 365 days, but check with the breed association to determine the proper time to scan. At this time also request the required paperwork for submission of ultrasound data.
- Complete as much of the breed association paperwork as possible prior to the technician arrival. Tattoo and registration numbers, birth dates, and even sire or dam registration numbers may be required
- Have proper facilities available. Every time an animal moves the image on the ultrasound monitor can be blurred. Squeeze chutes are a necessity in almost every case and several ultrasound technicians even bring hydraulic squeeze chutes with them. In addition, 110-volt power is required to run the ultrasound machines and image capturing equipment. Technicians bring clippers and blowers with to prepare the cattle for scanning and it is preferred that these are plugged into a circuit separate from the other equipment.
- Pan for at least a 7 days to get day back. Technician often have full schedules during peak times of the year so arrange your scan date well in advance of bull sales.
This was just a very brief overview of considerations for scan day. Ultrasound has uses in predicting feedlot endpoint as well as potential for incorporation into commercial cow-calf operations.
March 2007


